Jan
01
01
Your Summer Deck Makeover Essentials
[bc_video video_id="6262726889001" account_id="2226196965001" player_id="rkljM4WDEg"]
Summer is the time to enjoy our outdoor spaces but it’s also the time to do upkeep and tackle outdoor projects, like the deck!
The Colour Palette
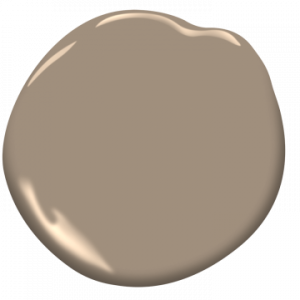
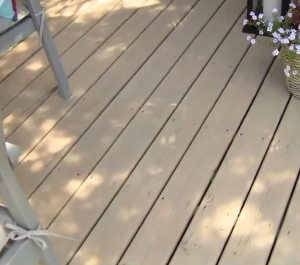
Mesa Verde Tan was the winner in a semi-transparent stain for the deck floor boards. I wanted to warm up the space and minimize the contrast to the pale brick plus the deck gets a ton of sunlight so this pale, warm tone won’t heat up too much remaining comfortable underfoot AND it will be a little more fade resistant.
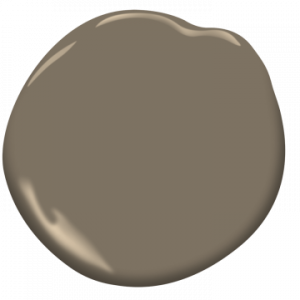
 I really love to create more interest on the surfaces by mixing up stain colours and opacities, so for contrast I chose Fairview Taupe in a solid stain for the privacy fence…and by wrapping it onto the lattice, it gives this corner a more cozy feel and helps to delineate the dining area!
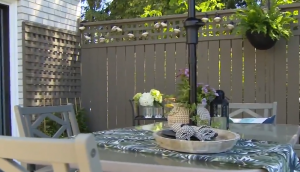 This area only had the one lattice by the side of the door – I added a lattice to the other side which really helped to tone down all the brick in the back of the house. In addition cedar planter boxes, stained in the same colour, were added under the lattice. By adding the planter box, we can add a clematis that will eventually grow and soften up this space as well.
 The Furniture Layout
The goal was to create a cozy outdoor living space for my sister and her husband to enjoy. It is quite a big space (400 sq.ft deck) so lots of great space to give them areas -for dining, lounging and cooking! But, we needed some more furniture to complete the look, without breaking the bank.
Dining Area
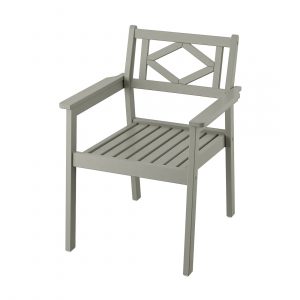
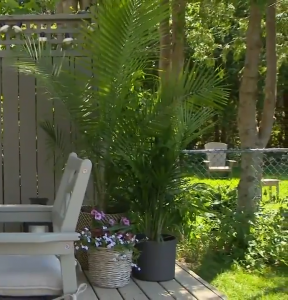
 I was able to find some beautiful and affordably priced solutions at IKEA! For the dining area, I kept the existing table, cause there was nothing wrong with it but switched out the chairs for these beautiful and super comfy BONDHOLMEN chairs. These chairs almost create an interior feel. Adding plants and some tall palms in the RÅGKORN planters create more privacy and coziness.
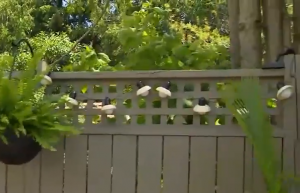
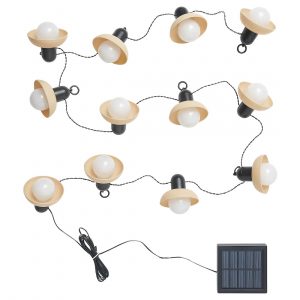
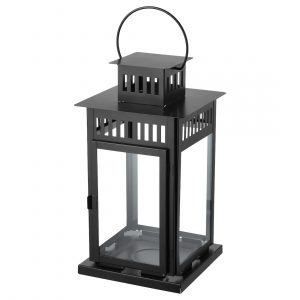
 Also, a lot of people want outdoor lighting but a lot of homes don’t have an exterior outlet so the SOLVINDEN solar string lights are a great solution for older homes. To light up the table, I went with an indoor/outdoor lantern, BORRBY.
 Lounge Area
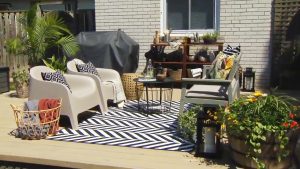
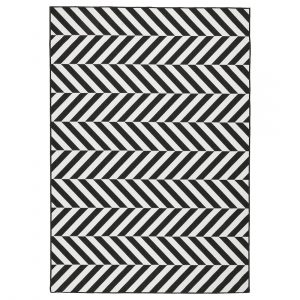
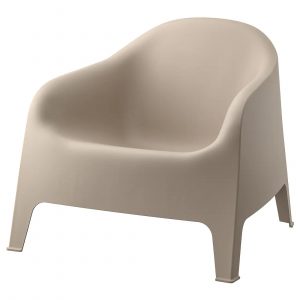
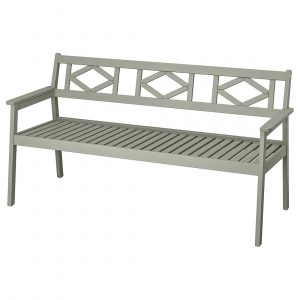
 This area is grounded with a black and white area outdoor rug, SKARRILD. The SKARPÖ chairs are kid friendly; add a touch of modern to the new lounge zone. The BONDHOLMEN bench is a great companion as it creates conversation area but is multifunctional and can be pulled over to the dining area when more seating is needed for 6!
 Cooking Area
 This area was grounded by a plastic rug, to protect the deck from any spills. A simple acacia wood storage shelf is the perfect height to place beside the BBQ in the cooking zone for essential tools & dishes.


 I really love to create more interest on the surfaces by mixing up stain colours and opacities, so for contrast I chose Fairview Taupe in a solid stain for the privacy fence…and by wrapping it onto the lattice, it gives this corner a more cozy feel and helps to delineate the dining area!

 This area only had the one lattice by the side of the door – I added a lattice to the other side which really helped to tone down all the brick in the back of the house. In addition cedar planter boxes, stained in the same colour, were added under the lattice. By adding the planter box, we can add a clematis that will eventually grow and soften up this space as well.
 The Furniture Layout
The goal was to create a cozy outdoor living space for my sister and her husband to enjoy. It is quite a big space (400 sq.ft deck) so lots of great space to give them areas -for dining, lounging and cooking! But, we needed some more furniture to complete the look, without breaking the bank.
Dining Area
 I was able to find some beautiful and affordably priced solutions at IKEA! For the dining area, I kept the existing table, cause there was nothing wrong with it but switched out the chairs for these beautiful and super comfy BONDHOLMEN chairs. These chairs almost create an interior feel. Adding plants and some tall palms in the RÅGKORN planters create more privacy and coziness.

 Also, a lot of people want outdoor lighting but a lot of homes don’t have an exterior outlet so the SOLVINDEN solar string lights are a great solution for older homes. To light up the table, I went with an indoor/outdoor lantern, BORRBY.


 Lounge Area
 This area is grounded with a black and white area outdoor rug, SKARRILD. The SKARPÖ chairs are kid friendly; add a touch of modern to the new lounge zone. The BONDHOLMEN bench is a great companion as it creates conversation area but is multifunctional and can be pulled over to the dining area when more seating is needed for 6!


 Cooking Area
 This area was grounded by a plastic rug, to protect the deck from any spills. A simple acacia wood storage shelf is the perfect height to place beside the BBQ in the cooking zone for essential tools & dishes.


Jan
01
01
How To Properly Stain Your Deck
[bc_video video_id="6262596186001" account_id="2226196965001" player_id="rkljM4WDEg"]
There are a lot of options for deck stains! Benjamin Moore alone has 5 different opacities to choose from.
The Stain
So for starters I took into consideration the condition of the deck: it's never been treated, has about 2.5 years of weathering and gets a lot of sun. Basically, the best case scenario.
 With wood that’s in great shape I usually treat it with a simple translucent (for a hint of colour that just enhances natural wood) or semi-transparent stain for a little more colour.
 If I want MORE colour, Semi-solid stains are great for covering imperfections, allowing some of the grain and texture of the wood to show through, while Solid Stains are more like paint and leave an opaque colour but still some of the wood texture. For this deck, we went with a semi-translucent stain.
 Tip: After properly preparing the wood, select an inconspicuous place on the actual wood you will be staining and test the stain to be sure you will be pleased with the final color results before buying! Will save you a lot of agony – I always test and I am always surprised at how different the colour looks (sunlight, wood species etc.). The Benjamin Moore website or brochures show the opacities but think about how many different types of wood there are out there. Pictured below is the same stain, Hamilton Blue, tested on two different types of wood:

 The Prep
To start, you always need a clean, dry and porous wood surface to stain. At the very least you will always have to sand to prepare the surface to accept stain.
 Let's go from most work to least:
 With wood that’s in great shape I usually treat it with a simple translucent (for a hint of colour that just enhances natural wood) or semi-transparent stain for a little more colour.
 If I want MORE colour, Semi-solid stains are great for covering imperfections, allowing some of the grain and texture of the wood to show through, while Solid Stains are more like paint and leave an opaque colour but still some of the wood texture. For this deck, we went with a semi-translucent stain.
 Tip: After properly preparing the wood, select an inconspicuous place on the actual wood you will be staining and test the stain to be sure you will be pleased with the final color results before buying! Will save you a lot of agony – I always test and I am always surprised at how different the colour looks (sunlight, wood species etc.). The Benjamin Moore website or brochures show the opacities but think about how many different types of wood there are out there. Pictured below is the same stain, Hamilton Blue, tested on two different types of wood:

 The Prep
To start, you always need a clean, dry and porous wood surface to stain. At the very least you will always have to sand to prepare the surface to accept stain.
 Let's go from most work to least:
- If you have solid coat and want to bring back the natural wood you have to REMOVE the finish with a chemical and/or lots of sanding!

- If the wood is extremely weathered RESTORE the wood with a specialty product, power wash and sand when dry to clean & remove the dead wood fibres. If wood is in good condition and simply dirty, CLEAN, let dry.


Jan
01
01
3 Fun Summer Science Experiments for Kids
[bc_video video_id="6262576907001" account_id="2226196965001" player_id="rkljM4WDEg"]
Looking for new ways to keep the kids entertained this summer? Natalie Preddie is rounding up her favourite DIY experiments that the whole family can enjoy.
Ice Cream in a Bag
Everyone loves ice cream! Imagine how exciting it is to make it by yourself?! We are giving our littles ones the power to create. What a fantastic and delicious discovery!
 Via: Delish
What you will need:
 What you will need:
 What you will need:
 Via: Delish
What you will need:
- 1 cup half/half or cream
- 1 ½ tsp of vanilla extract
- 1 tbsp sugar
- Ice
- ¼ Cup of Salt
- Ziploc bags (1 big & 1 small)
- Pour half/half (or cream) into Ziploc Bag
- Add vanilla & sugar
- Seal bag firmly to get out any excess air
- Fill larger Ziploc bag with ice and salt
- Add smaller Ziploc bag and cover with ice
- Get Gloves for shaking and shake for 6 minutes (this is a fun part for the kids to help with)
- Take the small bag out of the larger bag and rinse entirely
- Open the smaller bag carefully, ensuring that you do not get any salt on the inside
- Use a spoon to stir and TASTE
 What you will need:
- Jars
- Food Colouring
- Dish soap
- Water
- Bubble Wand or Wire
- Fill jars with small amount of dish soap
- Add a few drops of food colouring
- Fill jar halfway with water
- Use homemade wire wand to make bubbles
 What you will need:
- 2L soda bottle
- 3 unsharpened pencils
- Duct tape
- A cork (that fits the bottle)
- Paper towel
- Baking soda
- Vinegar – A lot!
- Prepare your rocket (not too many decorations or it will weigh the rocket down)
- Use the pencils like a stand
- Make a little baking soda ‘package’ in a paper towel
- Pour vinegar into bottle
- Quickly push in baking soda and then add cork
- WAIT
- STAND BACK

Jan
01
01
How To Best Protect Your Garden From Insects
[bc_video video_id="6262577085001" account_id="2226196965001" player_id="rkljM4WDEg"]
Steps to protect the garden from insects
 Via: Gardeners
Ants
Ants are one of the most common garden pests, they cause problems with the lawn and even get inside the house. There are many different methods to getting rid of ants that revolve around baiting and trapping. You can either purchase a trap, or make your own DIY Ant bait! Here's how to make it:
Mix equal parts sugar and Borax and place it out in a small mound. The ant thinks that this sugar is food for it's colony and will then bring it back, which will eventually exterminate the whole kingdom.
 Slugs
To prevent slugs, make sure to water in the morning. Watering at night/evening time leads to a wet garden overnight aka perfect slug habitat! Another option, if you spot slugs in your garden take regular table salt and throw a little dash of salt on them. This eliminates a slug's moisture which will eventual kill them.
 Via: Family Handy Man
Scale
Scale is a small bug that appears as bumps on the side of a plant's stem. To get rid of these, take a swab of rubbing alcohol.
 Diseases that can harm plants
 Via: Garden Design
Other diseases that are common include:
 Via: Gardening Know How
 Via: Ontario Agriculture
- Inspect gardens for damage every day.
- Water in the morning.
- If you see a bug, wash them off, use a high-pressure setting on the hose.
- Or pick them up and squish, old fashioned method.
- After you have gotten rid of the bugs, identify and find a long-term solution. This might be from an insecticidal soap. If you are using an insecticidal product, always spray in the evening hours so that foliage does not burn.
 Via: Gardeners
Ants
Ants are one of the most common garden pests, they cause problems with the lawn and even get inside the house. There are many different methods to getting rid of ants that revolve around baiting and trapping. You can either purchase a trap, or make your own DIY Ant bait! Here's how to make it:
Mix equal parts sugar and Borax and place it out in a small mound. The ant thinks that this sugar is food for it's colony and will then bring it back, which will eventually exterminate the whole kingdom.
 Slugs
To prevent slugs, make sure to water in the morning. Watering at night/evening time leads to a wet garden overnight aka perfect slug habitat! Another option, if you spot slugs in your garden take regular table salt and throw a little dash of salt on them. This eliminates a slug's moisture which will eventual kill them.
 Via: Family Handy Man
Scale
Scale is a small bug that appears as bumps on the side of a plant's stem. To get rid of these, take a swab of rubbing alcohol.
 Diseases that can harm plants
- Powdery Mildew
 Via: Garden Design
Other diseases that are common include:
- Black Spot
 Via: Gardening Know How
- Wilt
- Downey Mildew
 Via: Ontario Agriculture

Jan
01
01
A Beauty Expert's Sweatproof Summer Makeup Guide
[bc_video video_id="6262580161001" account_id="2226196965001" player_id="rkljM4WDEg"]
We’re in the midst of yet another hot girl summer and we want your makeup to be ready! Here is smart, sweatproof makeup tips that will help you beat the heat.
Start with your skin
With hot humidity weather, less is more. You don’t want to do full face of foundation concealer powder. It can be soooo much! I’m a huge advocate for sun protection so if you can find tinted moisturizers with SPF that’s amazing! There’s a good range too like Bb creams, tinted mineral SPFs, SPF foundations and then use concealer where needed. Use products that are light, and have dual-purpose.
When applying foundation with a beauty sponge, set the water with a fix setting spray, this will make for an easy and long-lasting application.
Beautiful brows
For brows be sure to stick to long wear products. Maybelline makes some great long wear products that are sweatproof, waterproof and stay on for 36 hrs! Their Tattoo Brow Pencil is amazing! Make sure when doing brows to remove any moisturizer or foundation. I would also powder your brows after for longevity.

 All about the eyes
I would stick to everything waterproof: mascaras, eyeshadow primers, eyeliners. Layer products as much as possible so it takes longer for the heat to wear it down. Wetting the eyeshadow brush with long wear spray instead of water makes for a smoother application that will last all day. Another great product to look out for are cream eyeshadows as they are easily applied and smudge-proof.

 Longwear lips
Stick to long wear products. I know Tracy loves the SuperStay Matte Ink Liquid Lipsticks because they don’t move. Glosses are great for summer, but don't last! This stuff does not budge, get ready to look glamorous in high humidity. I like applying it as blush for super long wear! I mix the lipstick and a bit of setting spray on my hand before I apply as blush- just remember to blend. Longwear lipstick to long wear blush!

 Finish with setting spray
To help your makeup stay in place as long as possible, finish up by applying a setting spray all over your face. A mattifying spray will also help cut down on shine, along with many other uses! The setting spray we recommend to finish your look and for all the step in between is the Lasting Fix Makeup Spray from Maybelline.
 Hot pandemic tip!: Spray inside your mask for optimal long wear.


 All about the eyes
I would stick to everything waterproof: mascaras, eyeshadow primers, eyeliners. Layer products as much as possible so it takes longer for the heat to wear it down. Wetting the eyeshadow brush with long wear spray instead of water makes for a smoother application that will last all day. Another great product to look out for are cream eyeshadows as they are easily applied and smudge-proof.

 Longwear lips
Stick to long wear products. I know Tracy loves the SuperStay Matte Ink Liquid Lipsticks because they don’t move. Glosses are great for summer, but don't last! This stuff does not budge, get ready to look glamorous in high humidity. I like applying it as blush for super long wear! I mix the lipstick and a bit of setting spray on my hand before I apply as blush- just remember to blend. Longwear lipstick to long wear blush!

 Finish with setting spray
To help your makeup stay in place as long as possible, finish up by applying a setting spray all over your face. A mattifying spray will also help cut down on shine, along with many other uses! The setting spray we recommend to finish your look and for all the step in between is the Lasting Fix Makeup Spray from Maybelline.
 Hot pandemic tip!: Spray inside your mask for optimal long wear.


